


The blockchain's critical feature is immutability because it brings censorship resistance. Anything uploaded on the blockchain is permanent and cannot be edited or removed. We love it because it makes data tamper-proof and results in a trust-minimized system. We don't have to trust any middle-man to not mess with the data. This safety guarantee is why we're building decentralized applications (DApps).
But are our DApps genuinely decentralized?
Yes, we host all of our logic on blockchains to create a trust-minimized system. However, most of these applications still have their data and frontends hosted on centralized infrastructure. This brings risks like vulnerability to censorship, single point of failure, and unforeseen price hikes for storage.
Then how can we make our DApps truly decentralized? This article walks through just that!
We will build a guestbook app and deploy it to Arweave by leveraging Bundlr's multi-chain storage scaling capabilities. Then we can share our completely decentralized application with our friends and have them drop cool messages for us!
But first, let's learn a little about Arweave and Bundlr.
What is Arweave?
Arweave is a protocol that allows us to store data permanently and sustainably, with a single upfront fee. The protocol uses a decentralized network to store the data, backed by a storage endowement to ensure its availability perpetually. It works like Uber for decentralized storage by connecting people with hard drive space to spare with people needing to store data or host content permanently.
The core technology used by Arweave to establish a blockchain-like decentralized network is called blockweave. It is a set of blocks containing data linked to multiple previous blocks in this network. This data structure allows the network to enforce that miners provide a "Proof of Access" (PoA) to old data to add new blocks.

On top of Arweave is a layer called the permaweb that looks like the traditional web but enables us to store any data and host our web apps in a permanent and decentralized manner while requiring low-cost and zero maintenance.
You can find more information in the Arweave wiki.
What is Bundlr?
Bundlr is a fast, easy-to-use, multi-chain storage scaling platform powered by Arweave. It makes Arweave more accessible by scaling the number of transactions conducted on Arweave by 4000% and data upload speeds by ~3000x without sacrificing security or usability. Bundlr enables users to pay for just the amount of data being stored instead of the fees for the entire block, and we can make payments in tokens other than Arweave's native $AR token.
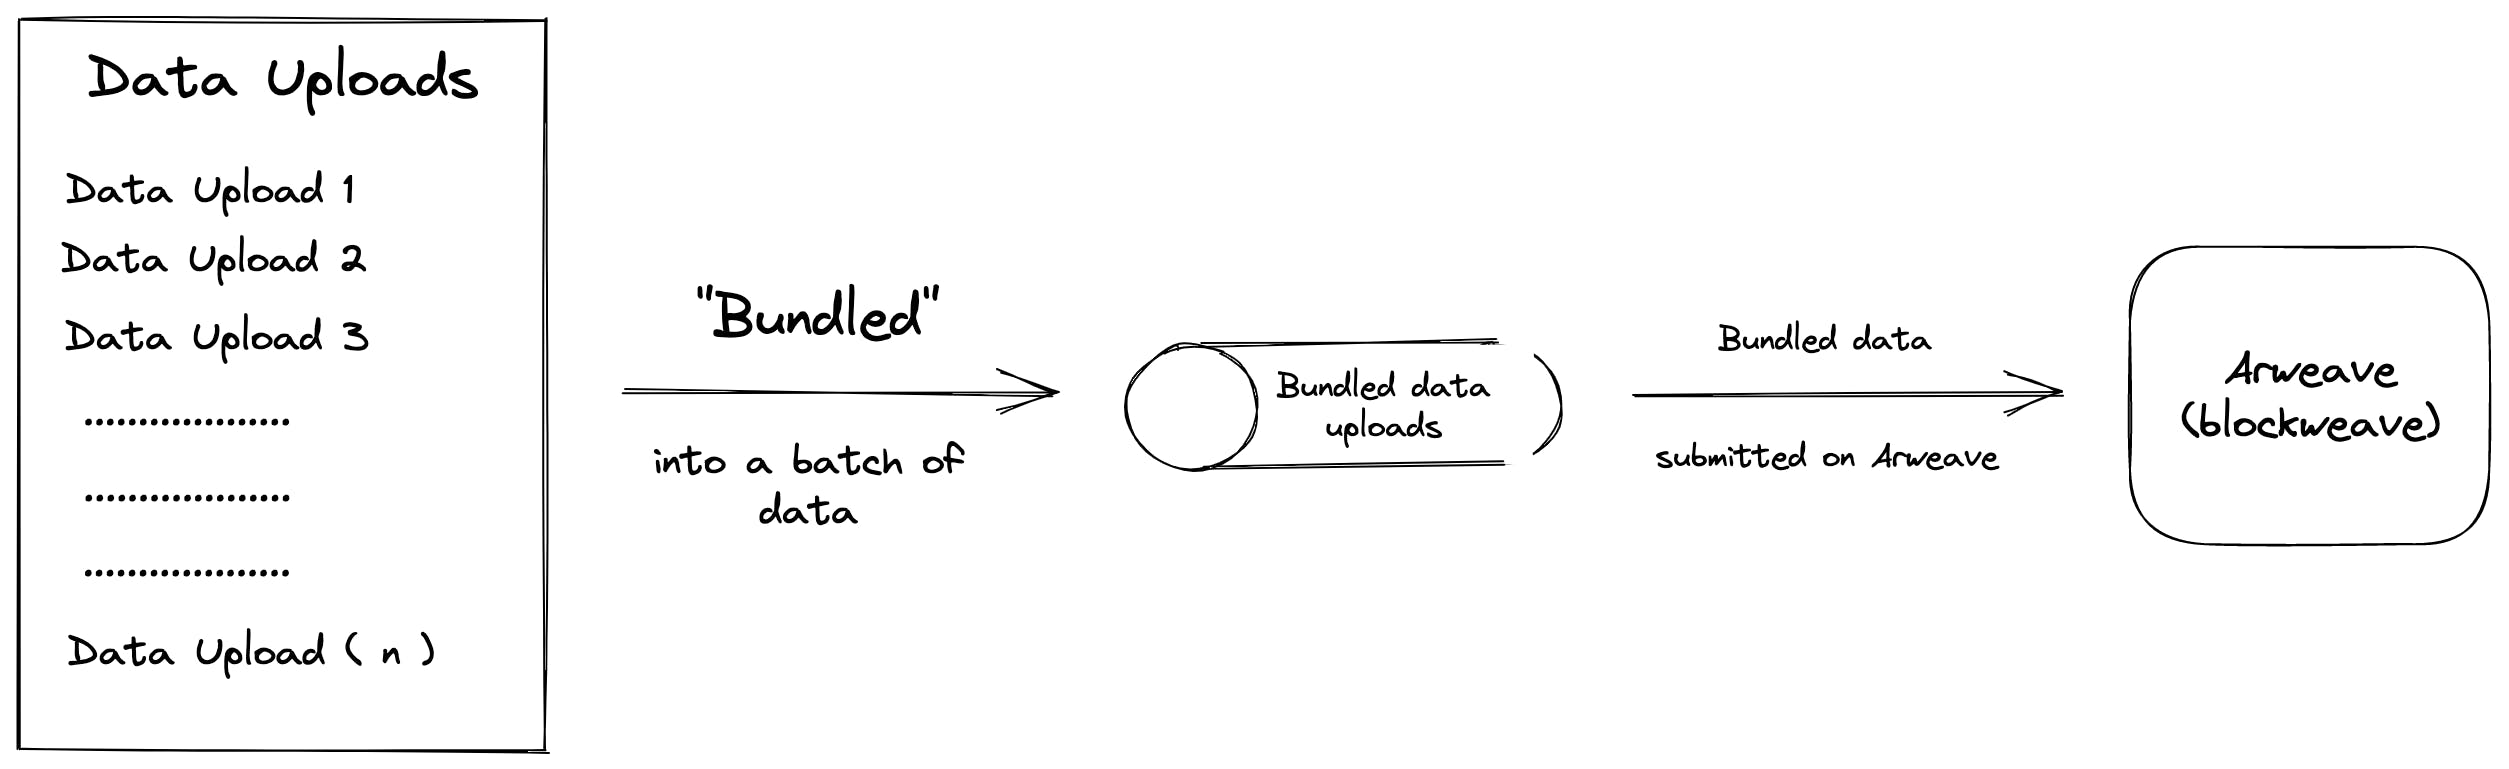
The Bundlr network consists of nodes known as bundlers. When a user uploads data to Bundlr, the nodes take this data and other data uploads and stick them together into a bundle, which it then submits to Arweave. Using this structure, Bundlr enables us to pay just for the amount of data we want to store. To top it off, we can upload any data under 100kB for free!
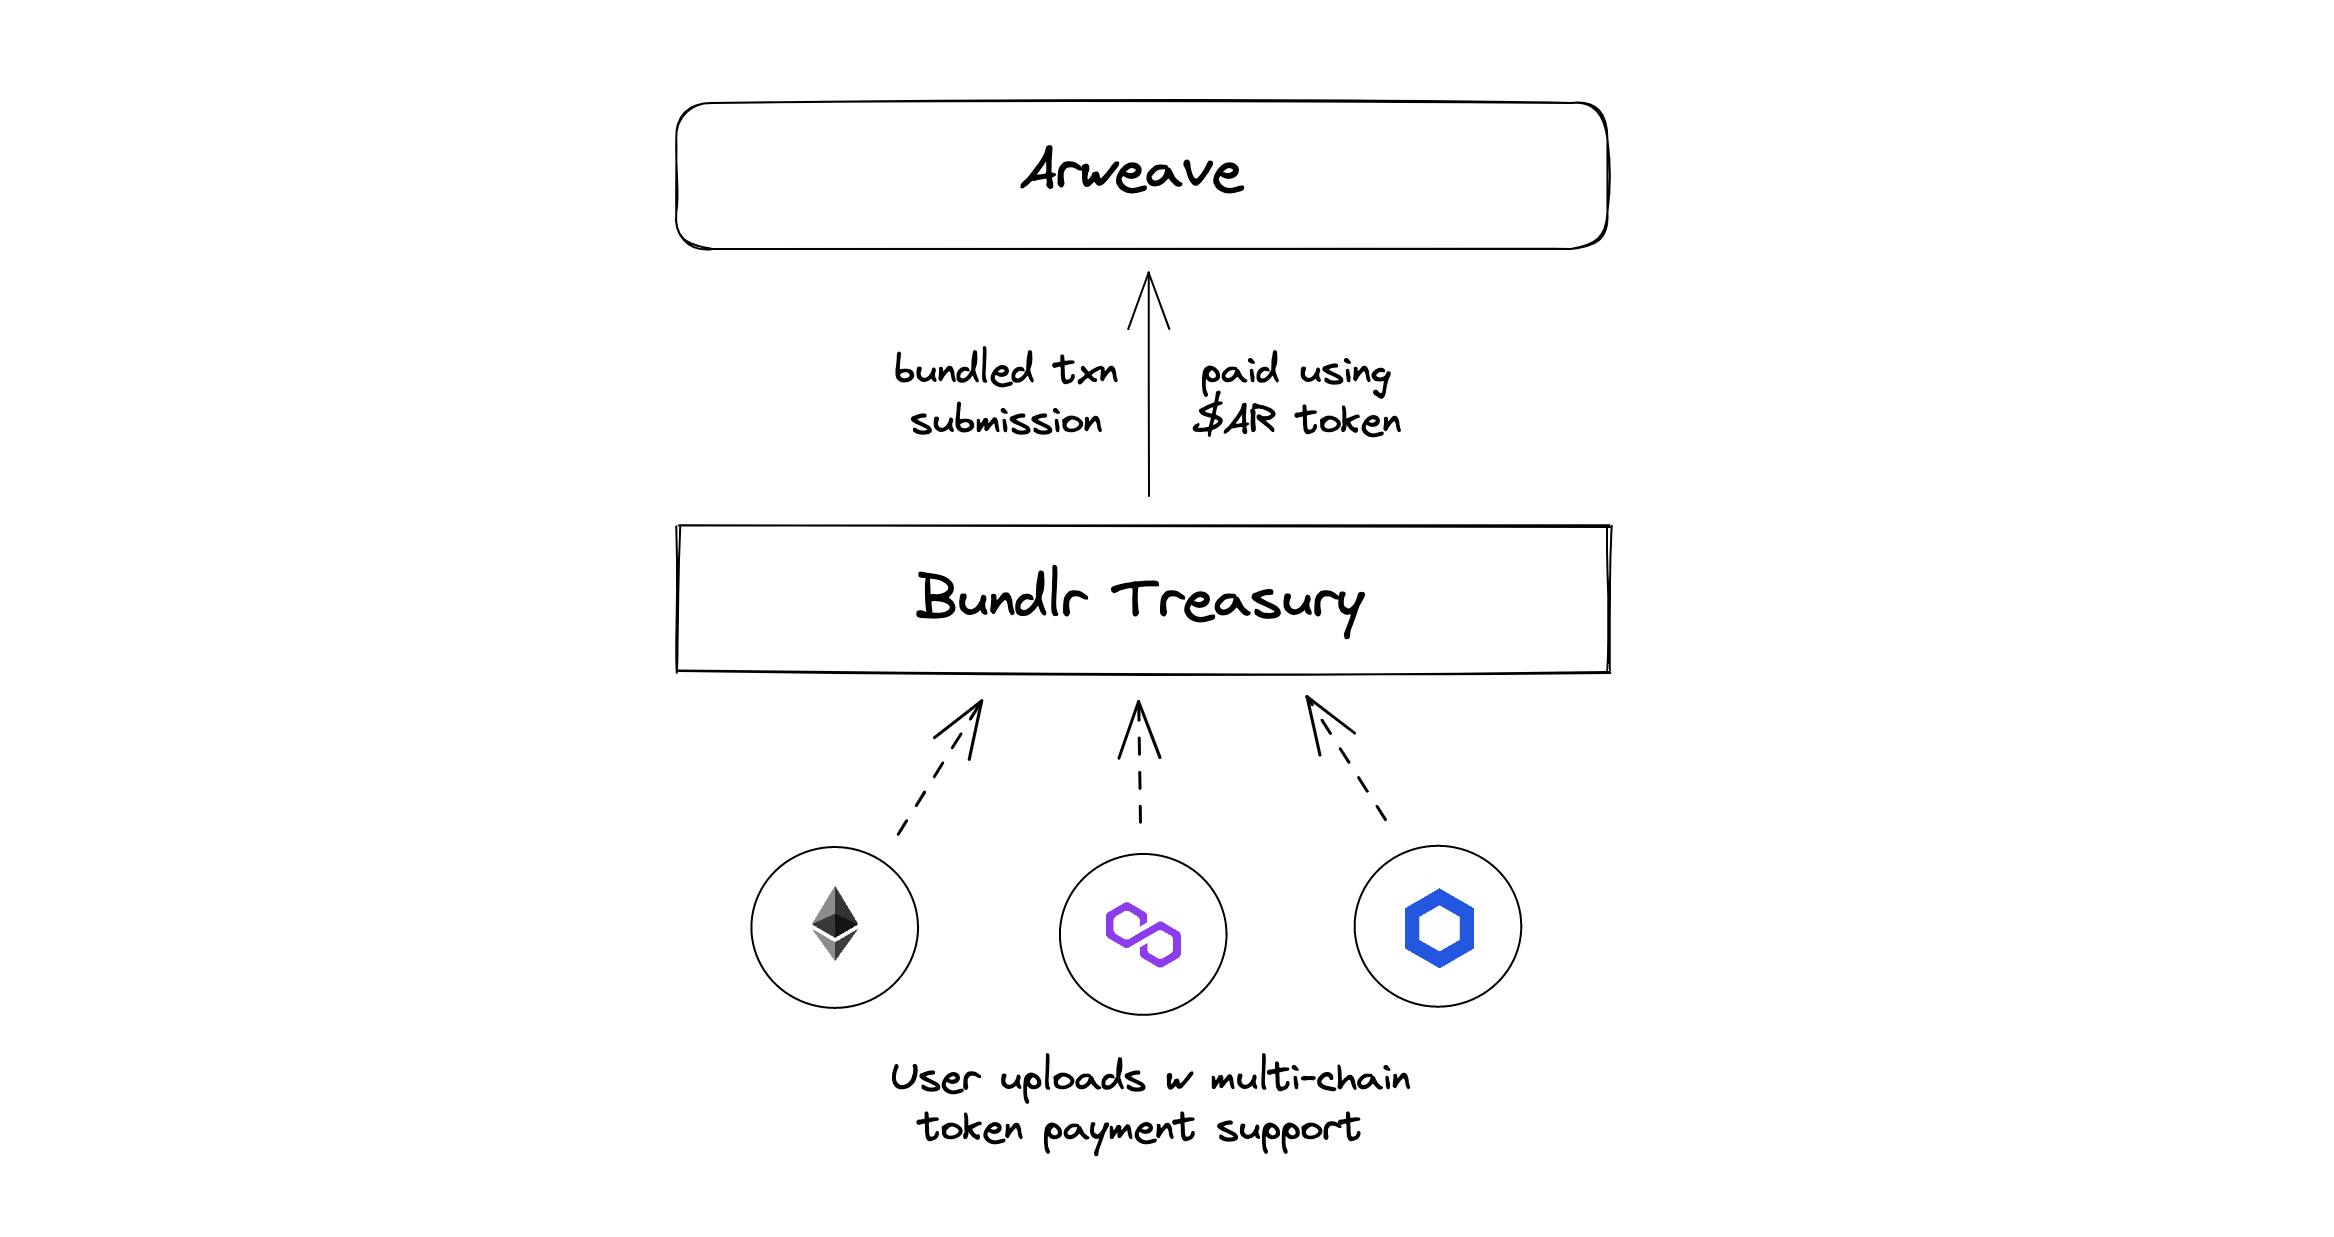
When submitting data to Arweave, Bundlr pays transaction fees using the $AR token it holds in its treasury. These tokens aren't easy to acquire and are often distributed in limited quantities for testing purposes. Bundlr solves this by accepting payments for data uploads from users in any token like ETH, MATIC, and LINK among others.
Checkout their docs for more info.
Getting Started
Now that we have a basic understanding of the need for decentralized storage and how Arweave and Bundlr will help us achieve that, we can start building our guestbook!
The tech stack we will use for this project:
- Smart Contract Language: Solidity
- Smart Contract Development Environment: Hardhat
- Frontend Language: JavaScript
- Framework: NextJS
- Wallet Connect: Rainbowkit
- Interacting with Contract through Frontend: Wagmi
- Decentralised Storage Protocol: Arweave
- Storage Scaling Solution: Bundlr
We will start by forking this starter repository. We can do so by clicking the 'fork' button at the top-right of the linked page. It has some basic configurations and setup out of the box for a seamless experience.
Once we have forked the repository, we will clone it locally to get cracking.
Remember to replace the link in the code block with the link of your cloned repository.
git clone https://github.com/ropats16/guestbook-bundlr-cli-starter-js
Now let's open the repository in our text editor and install the dependencies.
npm install

#or

yarn
With the editor setup, we can start writing our code.
Note: Throughout this article, some dropdowns help understand what a bunch of code is doing. Keep an eye out for them! Use the final repo as reference if stuck.
The Smart Contract
There's two main steps we need for the smart contract side of things, namely, writing the contract and deploying it.
Writing the Contract
We will start by creating a contracts folder in the root directory and a file named Guestbook.sol. We will write a simple smart contract that takes in messages from our friends, stores them in our contract, and fetches them so we can display them to everyone.
Let's start by copy-pasting the code from the dropdown into this new file, and then we can see what the code does block-by-block.
// SPDX-License-Identifier: MIT
pragma solidity ^0.8.7;

contract Guestbook {
    struct Message {
        address sender;
        string message;
    }

    Message[] messages;

    mapping(address => uint256) public lastMessagedAt;

    function message(string memory _message) public {
        require(
            lastMessagedAt[msg.sender] + 30 seconds < block.timestamp,
            "Wait 30 seconds"
        );

        lastMessagedAt[msg.sender] = block.timestamp;

        messages.push(Message(msg.sender, _message));
    }

    function getAllMessages() public view returns (Message[] memory) {
        return messages;
    }
}
Guestbook.sol code walkthrough
Okay, so let's understand what our contract is doing.
// SPDX-License-Identifier: MIT
pragma solidity ^0.8.7;
We start by declaring the license we want to use for our code. This helps specify copyrights, and we will use the MIT license in the spirit of open source. More on licenses can be found here.
Then, we declare the version of solidity we are using to compile our code. A ^ sign in front of the code tells the compiler that any version including 0.8.7 and above would work.
contract Guestbook {
    struct Message {
        address sender;
        string message;
    }

    Message[] entries;

    mapping(address => uint256) public lastMessagedAt;
}
Next, we define a contract and name it Guestbook. A good naming convention for smart contracts is using the same name for the file and contract.
Message is a custom data type will help us store and retrieve the information we want. In this case, we want to store a user's wallet address and the message they wish to send.
We use an array named messages to store all the Messages signed in our guestbook.
lastMessagedAt mapping allows us to bind the time the user last messaged. We will use this to prevent users from spamming our guestbook.
function message(string memory _message) public {
    require(
        lastMessagedAt[msg.sender] + 30 seconds < block.timestamp,
        "Wait 30 seconds"
    );

    lastMessagedAt[msg.sender] = block.timestamp;

    messages.push(Message(msg.sender, _message));
}
The function message starts by checking if at least 30 seconds have elapsed since a user has last messaged; if not, they must wait. Then it updates the new time of messaging in our mapping. Finally, it stores the new entry with the user's address and message in our array.
function getAllMessages() public view returns (Message[] memory) {
    return messages;
}
Lastly, we have a function that helps us getAllMessages stored in the array.
Awesome! We just wrote a smart contract. Now we deploy.
Deploying the Contract
We will deploy our contract to the rinkeby test network using hardhat. The starter repo has been mostly pre-configured to be able to do so, but we still need a couple of things:
- We need some
rinkeby ETH. Get some at a faucet. - An API key from an RPC node to interact with the blockchain. You can get one here.
- The private key of your account with the test ETH. Learn how to get your private key here.
Note: API and Private keys are sensitive information, and it is best not to share them with anyone. To keep them safe, we use environment variables. This protects us from accidentally publishing them.
To use environment variables, rename the existing file named .env.example to .env. Then paste the keys in their relevant variables after the =.
Do not enclose these keys in quotation marks.
Great job so far!
Okay, but how do we deploy?
We need to tell hardhat how to do that. We can tell hardhat that using a deploy script. Create a new deploy folder in the root directory and a file named 00_deploy_contract.js. Paste the following code in it:
// deploy/00_deploy_contract

module.exports = async ({ getNamedAccounts, deployments }) => {
  const { deploy } = deployments;
  const { deployer } = await getNamedAccounts();

  const args = [];
  await deploy('Guestbook', {
    // Learn more about args here: https://www.npmjs.com/package/hardhat-deploy#deploymentsdeploy
    args: args,
    from: deployer,
    log: true,
  });
};
module.exports.tags = ['all', 'guestbook'];
This script is telling hardhat that we are going to deploy our Guestbook contract and the deployer account is the one we entered the private key for.
If our contract had a constructor with arguments, we could pass them in const args, but since we do not have any, we will keep it empty.
When the contract is successfully deployed, we will get a log in our console telling us the address where our contract has been deployed.
Cool, we're set to deploy!
Now we just run the following in our terminal:
Note: Our Hardhat has been configured to deploy to the rinkeby test network. Feel free to make changes if you wish to deploy on another network.
npm run deploy

#or

yarn deploy
This command will check if our contract compiles successfully, deploy it to our chosen network and then return a console log with our contract's address.
When we deployed our contract a new folder named deployments with many files and sub-folders was generated, we will need this later to fetch the ABI of our contract.
Wow! We just deployed our contract. We can head over to rinkeby.etherscan.io and paste our contract address to see the transaction. Although, we may see a mostly blank page with no entries because no one has interacted with our contract and sent us a message.
Let's give folks a user interface to do that.
The Frontend
For our friends to interact with our guestbook, we want to provide them with a UI that they can sign in to, leave a message for us and view messages sent by other friends!
To connect our smart contract to the frontend and interact with it, we will use wagmi. It gives us a bunch of React Hooks out of the box to do the same.
Creating Components
We start by creating some components that will interact with our smart contract's functions and enable us to send messages and read them. Components are blocks of code that can be imported and used with a few lines of code to make the actual application's code look clean and concise.
The first component will help us send a message to our Guestbook contract. Create a components folder and in it a file named SendMessage.js. Paste the following in it:
import { useEffect, useState } from 'react';
import { useContract, useSigner } from 'wagmi';

import GuestbookABI from '/deployments/rinkeby/Guestbook.json'

export const SendMessage = () => {
  const [newMessage, setNewMessage] = useState('');
  const [loading, setLoading] = useState(true);
  const [error, setError] = useState('');

  const { data: signerData } = useSigner();

  const guestbookAddress = "0xD201410C8C31Ce71fc293Be13bdF47586d30CD74";
  const guestbookABI = GuestbookABI.abi;

  const guestbookContract = useContract({
    addressOrName: guestbookAddress,
    contractInterface: guestbookABI,
    signerOrProvider: signerData,
  });

  useEffect(() => {
    if (signerData) {
      setError('');
      setLoading(false);
    } else {
      setLoading(false);
      setError('please connect your wallet');
    }
  }, [signerData]);

  const handleSubmit = async (e) => {
    e.preventDefault();
    try {
      setLoading(true);
      const tx = await guestbookContract.message(newMessage);
      await tx.wait();
      setNewMessage('');
      setLoading(false);
    } catch (error) {
      setError('txn failed, check contract');
      setLoading(false);
    }
  };

  if (loading) {
    return <div>Loading...</div>;
  }

  if (error) {
    return <div>{error}</div>;
  }

  return (
    <div style={{
      marginLeft: '10em',
      marginRight: '10em'
    }}>
      <form style={{
        display: 'flex',
        flexDirection: 'column',
        marginTop: '1em',
        }}
        onSubmit={(e) => handleSubmit(e)}>
        <textarea
          required
          value={newMessage}
          placeholder='new message'
          onChange={(e) => setNewMessage(e.target.value)}
          style={{
            padding: '1em',
            border: '0.1em solid #e8e8e8',
            borderRadius: '0.5em',
            boxShadow: '0 0.2em 0.4em 0 rgba(0, 0, 0, 0.2), 0 0.3em 1em 0 rgba(0, 0, 0, 0.19)'
        }}
        />
        <button style={{
            fontWeight: '700',
            width: '7em',
            padding: '0.4em',
            alignSelf: 'center',
            marginTop: '1em',
            border: '0.2em solid white',
            color: 'white',
            backgroundColor: '#2b77ff',
            borderRadius: '0.5em',
            boxShadow: '0 0.2em 0.4em 0 rgba(0, 0, 0, 0.2), 0 0.3em 1em 0 rgba(0, 0, 0, 0.19)'
            }}
            type="submit">
          submit
        </button>
      </form>
    </div>
  );
};
Remember to replace the guestbookAddress with your own contract address. Also, do not share contract addresses if it contains sensitive functions. The address shown here is for test purposes, so I have shared it.
SendMessage.js code walkthrough
So how does this component work?
import { useEffect, useState } from 'react';
import { useContract, useSigner } from 'wagmi';

import GuestbookABI from '/deployments/rinkeby/Guestbook.json'
We begin by importing some stuff:
useEffectanduseStatehelp us perform side effects and capture the state, respectively.useContractanduseSignerwill enable us to create an instance of our contract and get the connected accounts data, respectively.- The last import fetches our contract's Application Binary Interface (ABI). The ABI helps us interact with the smart contract outside the blockchain or contract-to-contract. You can read more about ABIs here.
export const SendMessage = () => {
  const [newMessage, setNewMessage] = useState('');
  const [loading, setLoading] = useState(true);
  const [error, setError] = useState('');

  const { data: signerData } = useSigner();

  const guestbookAddress = "0xD201410C8C31Ce71fc293Be13bdF47586d30CD74";
  const guestbookABI = GuestbookABI.abi;

}
First, we create a component named SendMessage. Again, a good convention is to use the same name for the component and file.
const [newMessage, setNewMessage] = useState('') captures the value of the message input given by a user. By default we set its value to an empty string.
A couple of useState hooks to set the loading and error state.
We are fetching the connected account's signerData using the useSigner hook.
We are storing our contract's address and ABI in constants.
const guestbookContract = useContract({
  addressOrName: guestbookAddress,
  contractInterface: guestbookABI,
  signerOrProvider: signerData,
});
We pass in the contract address, contract ABI, and signer data to create an instance of our smart contract and interact with it using the useContract hook.
useEffect(() => {
  if (signerData) {
    setError('');
    setLoading(false);
  } else {
    setLoading(false);
    setError('please connect your wallet');
  }
}, [signerData]);
Check if a wallet is connected; else, ask the user to connect a wallet. The use effect runs when signerData is updated.
const handleSubmit = async (e) => {
  e.preventDefault();
  try {
    setLoading(true);
    const tx = await guestbookContract.message(newMessage);
    await tx.wait();
    setNewMessage('');
    setLoading(false);
  } catch (error) {
    setError('txn failed, check contract');
    setLoading(false);
  }
};
The handleSubmit function runs when the user clicks the submit button.
We invoke the message function of our contract and pass in the user's message value as an argument. The await keyword means waiting for the blockchain to acknowledge this request before moving to the following line of code.
Then we wait to get approval for our transaction. Until this point, we set loading to true because we must wait until we get responses from the blockchain.
Once we receive the responses, we reset the value of loading and newMessage.
If an error occurs during this process, our code will enter the else condition and throw an error.
if (loading) {
  return <div>Loading...</div>;
}

if (error) {
  return <div>{error}</div>;
}
If loading is true, we show Loading to the user.
If an error occurs, we show the appropriate error to the user.
return (
  <div style={{
    marginLeft: '10em',
    marginRight: '10em'
  }}>
    <form style={{
      display: 'flex',
      flexDirection: 'column',
      marginTop: '1em',
      }}
      onSubmit={(e) => handleSubmit(e)}>
      <textarea
        required
        value={newMessage}
        placeholder='new message'
        onChange={(e) => setNewMessage(e.target.value)}
        style={{
          padding: '1em',
          border: '0.1em solid #e8e8e8',
          borderRadius: '0.5em',
          boxShadow: '0 0.2em 0.4em 0 rgba(0, 0, 0, 0.2), 0 0.3em 1em 0 rgba(0, 0, 0, 0.19)'
      }}
      />
      <button style={{
          fontWeight: '700',
          width: '7em',
          padding: '0.4em',
          alignSelf: 'center',
          marginTop: '1em',
          border: '0.2em solid white',
          color: 'white',
          backgroundColor: '#2b77ff',
          borderRadius: '0.5em',
          boxShadow: '0 0.2em 0.4em 0 rgba(0, 0, 0, 0.2), 0 0.3em 1em 0 rgba(0, 0, 0, 0.19)'
          }}
          type="submit">
        submit
      </button>
    </form>
  </div>
);
Lastly, the return statement has a form with an input field for the message, and a submit button that triggers the handleSubmit function that, in turn, makes a call to our smart contract.
Some default styling has been added to elements but feel free to edit it!
Next, we need the component to fetch users' messages to our guestbook. Create a file named GetMessages.js in the components folder and paste this code.
import { useEffect, useState, useCallback } from 'react';
import { useContract, useProvider } from 'wagmi';

import GuestbookABI from '/deployments/rinkeby/Guestbook.json'

export const GetMessages = () => {
  const [allMessages, setAllMessages] = useState([]);
  const [loading, setLoading] = useState(true);
  const [error, setError] = useState('');

  const provider = useProvider();

  const guestbookAddress = "0xD201410C8C31Ce71fc293Be13bdF47586d30CD74";
  const guestbookABI = GuestbookABI.abi;

  const guestbookContract = useContract({
    addressOrName: guestbookAddress,
    contractInterface: guestbookABI,
    signerOrProvider: provider,
  });

  const getTruncatedAddress = (
    address,
    length
  ) => {
    if (!address) {
      return '';
    }

    return `${address.slice(0, length + 2)}...${address.slice(
      address.length - length
    )}`;
  };

  const fetchData = useCallback(async () => {
    try {
      const messages = await guestbookContract.getAllMessages();
      let messagesCleaned = [];
      messages.forEach(message => {
        messagesCleaned.push({
          address: message.sender,
          message: message.message,
        })
      });
      setAllMessages(messagesCleaned);
      setError('');
    } catch (error) {
      setError("Contract couldn't be fetched.  Please check your network.");
    }
    setLoading(false);
  }, [guestbookContract]);

  useEffect(() => {
    if (provider) {
      fetchData();
    }
  }, [provider, guestbookContract, fetchData]);

  if (loading) {
    return <div>Loading...</div>;
  }

  if (error) {
    return <div>{error}</div>;
  }

  return (
    <div style={{
        display: 'flex',
        flexDirection: 'column',
        alignSelf: 'stretch',
        marginTop: '1em',
        marginLeft: '10em',
        marginRight: '10em'
        }}>
      <h2 style={{ alignSelf: 'center' }}>Messages</h2>
      {allMessages.map((message, index) => {
          return (
            <div key={index} style={{
                marginTop: '1em',
                padding: '1em',
                border: '0.1em solid #e8e8e8',
                borderRadius: '0.5em',
                boxShadow: '0 0.2em 0.4em 0 rgba(0, 0, 0, 0.2), 0 0.3em 1em 0 rgba(0, 0, 0, 0.19)'
                }}>
              <div>Address: {getTruncatedAddress(message.address, 3)}</div>
              <div>Message: {message.message}</div>
            </div>)
        })}
      <button style={{
        fontWeight: '700',
            width: '7em',
            padding: '0.4em',
            alignSelf: 'center',
            marginTop: '1em',
            border: '0.2em solid white',
            color: 'white',
            backgroundColor: '#2b77ff',
            borderRadius: '0.5em',
            boxShadow: '0 0.2em 0.4em 0 rgba(0, 0, 0, 0.2), 0 0.3em 1em 0 rgba(0, 0, 0, 0.19)'
        }}
        onClick={() => fetchData()}>
        refresh
      </button>
    </div>
  );
};
GetMessages.js code walkthrough
A few elements from the previous component are repeated in this one, so we will only walk through the new ones.
import { useEffect, useState, useCallback } from 'react';
import { useContract, useProvider } from 'wagmi';
The useCallback hook prevents resource-intensive functions from running on every render. Instead, it runs when one of its dependencies is updated.
Reading data off the blockchains (messages in this case) does not require a signature. We just need a provider that helps us communicate with the blockchain. To use this provider, we leverage wagmi's useProvider hook.
export const GetMessages = () => {
  const [allMessages, setAllMessages] = useState([]);

}
We create a component named GetMessages.
A useState is required to capture the array of messages we will receive from our contract's getAllMessages function.
const provider = useProvider();
useProvider sets the provider detected and is passed onto the useContract hook in place of signer data for us to interact with the blockchain and contract.
const getTruncatedAddress = (
  address,
  length
) => {
  if (!address) {
    return '';
  }

  return `${address.slice(0, length + 2)}...${address.slice(
    address.length - length
  )}`;
};
getTrucatedAddress displays the message sender's address in a more readable and aesthetic format.
const fetchData = useCallback(async () => {
  try {
    const messages = await guestbookContract.getAllMessages();
    let messagesCleaned = [];
    messages.forEach(message => {
      messagesCleaned.push({
        address: message.sender,
        message: message.message,
      })
    });
    setAllMessages(messagesCleaned);
    setError('');
  } catch (error) {
    setError("Contract couldn't be fetched.  Please check your network.");
  }
  setLoading(false);
}, [guestbookContract]);
The function fetchData calls the getAllMessages function from our smart contract.
We use the useCallback hook so that data is fetched only when the guestbook contract is updated.
Once a response is received, we convert it to renderable format and store it in a new array named messagesCleaned. Since our custom data type Message in solidity has two pieces of information (i.e., wallet address and message string), we store two key-value pairs for each element in the messagesCleaned array.
The value of this array is set using setAllMessages.
The process terminates with the relevant error message if an error occurs during these steps.
useEffect(() => {
  if (provider) {
    fetchData();
  }
}, [provider, guestbookContract, fetchData]);
useEffect calls the fetchData function anytime the provider updates the guestbook contract or fetchData function.
return (
  <div style={{
      display: 'flex',
      flexDirection: 'column',
      alignSelf: 'stretch',
      marginTop: '1em',
      marginLeft: '10em',
      marginRight: '10em'
      }}>
    <h2 style={{ alignSelf: 'center' }}>Messages</h2>
    {allMessages.map((message, index) => {
        return (
          <div key={index} style={{
              marginTop: '1em',
              padding: '1em',
              border: '0.1em solid #e8e8e8',
              borderRadius: '0.5em',
              boxShadow: '0 0.2em 0.4em 0 rgba(0, 0, 0, 0.2), 0 0.3em 1em 0 rgba(0, 0, 0, 0.19)'
              }}>
            <div>Address: {getTruncatedAddress(message.address, 3)}</div>
            <div>Message: {message.message}</div>
          </div>)
      })}
    <button style={{
      fontWeight: '700',
          width: '7em',
          padding: '0.4em',
          alignSelf: 'center',
          marginTop: '1em',
          border: '0.2em solid white',
          color: 'white',
          backgroundColor: '#2b77ff',
          borderRadius: '0.5em',
          boxShadow: '0 0.2em 0.4em 0 rgba(0, 0, 0, 0.2), 0 0.3em 1em 0 rgba(0, 0, 0, 0.19)'
      }}
      onClick={() => fetchData()}>
      refresh
    </button>
  </div>
);
We create a map that walks through each Message element of the array and displays it on our frontend using div elements.
A refresh button calls the fetchData function and lets us update the displayed messages if needed.
Again, some default styling is provided but feel free to change it.
Now that we have our components, we want to 'export' them to use them in our frontend. We can do so easily by creating a file named index.js in the components folder and adding the following code:
export { GetMessages } from './GetMessages';
export { SendMessage } from './SendMessage';
Editing the Main Application
The two files we will be working with are _app.js and index.js. You find them inside the pages folder.
Replace the existing code in the _app.js file with the following:
import * as React from 'react';
import NextHead from 'next/head';
import '../styles/globals.css';

import { chain, createClient, WagmiConfig, configureChains } from 'wagmi';
import { publicProvider } from 'wagmi/providers/public';

import '@rainbow-me/rainbowkit/styles.css';
import { getDefaultWallets, RainbowKitProvider } from '@rainbow-me/rainbowkit';

import { useIsMounted } from '../hooks';

const { chains, provider } = configureChains(
  [chain.rinkeby, chain.mainnet],
  [publicProvider()]
);

const { connectors } = getDefaultWallets({
  appName: 'Guestbook',
  chains,
});

const wagmiClient = createClient({
  autoConnect: true,
  connectors,
  provider,
});

const App = ({ Component, pageProps }) => {
  const isMounted = useIsMounted();

  if (!isMounted) return null;
  return (
    <WagmiConfig client={wagmiClient}>
      <RainbowKitProvider coolMode chains={chains}>
        <NextHead>
          <title>guestbook app</title>
        </NextHead>
        <Component {...pageProps} />
      </RainbowKitProvider>
    </WagmiConfig>
  );
};

export default App;
_app.js code walkthrough
Wow, that's a lot of imports. Let's see what they are and how they help our code.
import * as React from 'react';
import NextHead from 'next/head';
import '../styles/globals.css';

import { chain, createClient, WagmiConfig, configureChains } from 'wagmi';
import { publicProvider } from 'wagmi/providers/public';

import '@rainbow-me/rainbowkit/styles.css';
import { getDefaultWallets, RainbowKitProvider } from '@rainbow-me/rainbowkit';

import { useIsMounted } from '../hooks';
chain, createClient, WagmiConfig, configureChainshelp us manage the wallet connection state and config, the config of hooks, and config of chains with providers. Read more about Wagmi here.publicProvidergets us a fallback RPC that we can use to connect to the blockchain.@rainbow-me/rainbowkit/styles.cssgives us some out-of-the-box styling for ourConnect Walletbutton.getDefaultWallets, RainbowKitProviderfetches the default wallets (e.g. MetaMask) and some default configs for us. Read more on Rainbowkit here.- The
useIsMountedis a custom hook that checks if components are mounted before making changes to the state of our application.
const { chains, provider } = configureChains(
  [chain.rinkeby, chain.mainnet],
  [publicProvider()]
);

const { connectors } = getDefaultWallets({
  appName: 'Guestbook',
  chains,
});

const wagmiClient = createClient({
  autoConnect: true,
  connectors,
  provider,
});
This is the config of chains and connectors we want to use with the wagmiClient.
const App = ({ Component, pageProps }) => {
  const isMounted = useIsMounted();

  if (!isMounted) return null;
  return (
    <WagmiConfig client={wagmiClient}>
      <RainbowKitProvider coolMode chains={chains}>
        <NextHead>
          <title>guestbook app</title>
        </NextHead>
        <Component {...pageProps} />
      </RainbowKitProvider>
    </WagmiConfig>
  );
};

export default App;
Finally, we create our App component and wrap it with the WagmiConfig and RainbowKitProvider so that we can access these configurations through all the pages and components of our app.
Now that we can use the rainbowkit and wagmi configs, we can finally get hacking on our index page. Replace the existing content of the index.js file in the pages folder with the following code:
import Head from 'next/head';
import { ConnectButton } from '@rainbow-me/rainbowkit';
import { SendMessage, GetMessages } from '../components';
export default function Home() {
return (
<div className={''}>
<Head>
<title>Guestbook App</title>
<meta name="description" content="Generated by npx create-web3" />
<link rel="icon" href="/favicon.ico" />
</Head>
<header style={{ padding: '1rem' }}>
<ConnectButton />
</header>
<main
style={{
minHeight: '60vh',
flex: '1',
display: 'flex',
flexDirection: 'column',
justifyContent: 'center',
alignItems: 'center',
}}
>
<h1>Ropats' Guestbook</h1>
<SendMessage />
<GetMessages />
</main>
</div>
);
}
index.js code walkthrough
So let's understand what is happening on our index page.
import { ConnectButton } from '@rainbow-me/rainbowkit';
import { SendMessage, GetMessages } from '../components';
ConnectButton is a simple out-of-the-box connect wallet button provided by RainbowKit.
We also import the SendMessage and GetMessages components we created earlier.
export default function Home() {
  return (
    <div className={''}>
      <Head>
        <title>Guestbook App</title>
        <meta name="description" content="Generated by npx create-web3" />
        <link rel="icon" href="/favicon.ico" />
      </Head>

}
We create our Home page and add the page title, metadata, and links.
<header style={{ padding: '1rem' }}>
  <ConnectButton />
</header>
Within our header, we pass the ConnectButton component.
<main
style={{
minHeight: '60vh',
flex: '1',
display: 'flex',
flexDirection: 'column',
justifyContent: 'center',
alignItems: 'center',
}}
>
<h1>Ropats' Guestbook</h1>
<SendMessage />
<GetMessages />
</main>
Finally, in our main element, we pass in a heading. Replace Ropats with your name (e.g., Einstein's).
Note: If using an apostrophe, use it as
'. Typing a traditional apostrophe as it is would be considered as a single quotation mark and throw and error in one of the next steps.
Then, we pass in the components we created to send a message and get the sent messages.
Cheers! We've written a fair bit of code. Now is the moment of truth. We run the local dev environment.
npm run dev

#or

yarn dev
We should see a page like this:
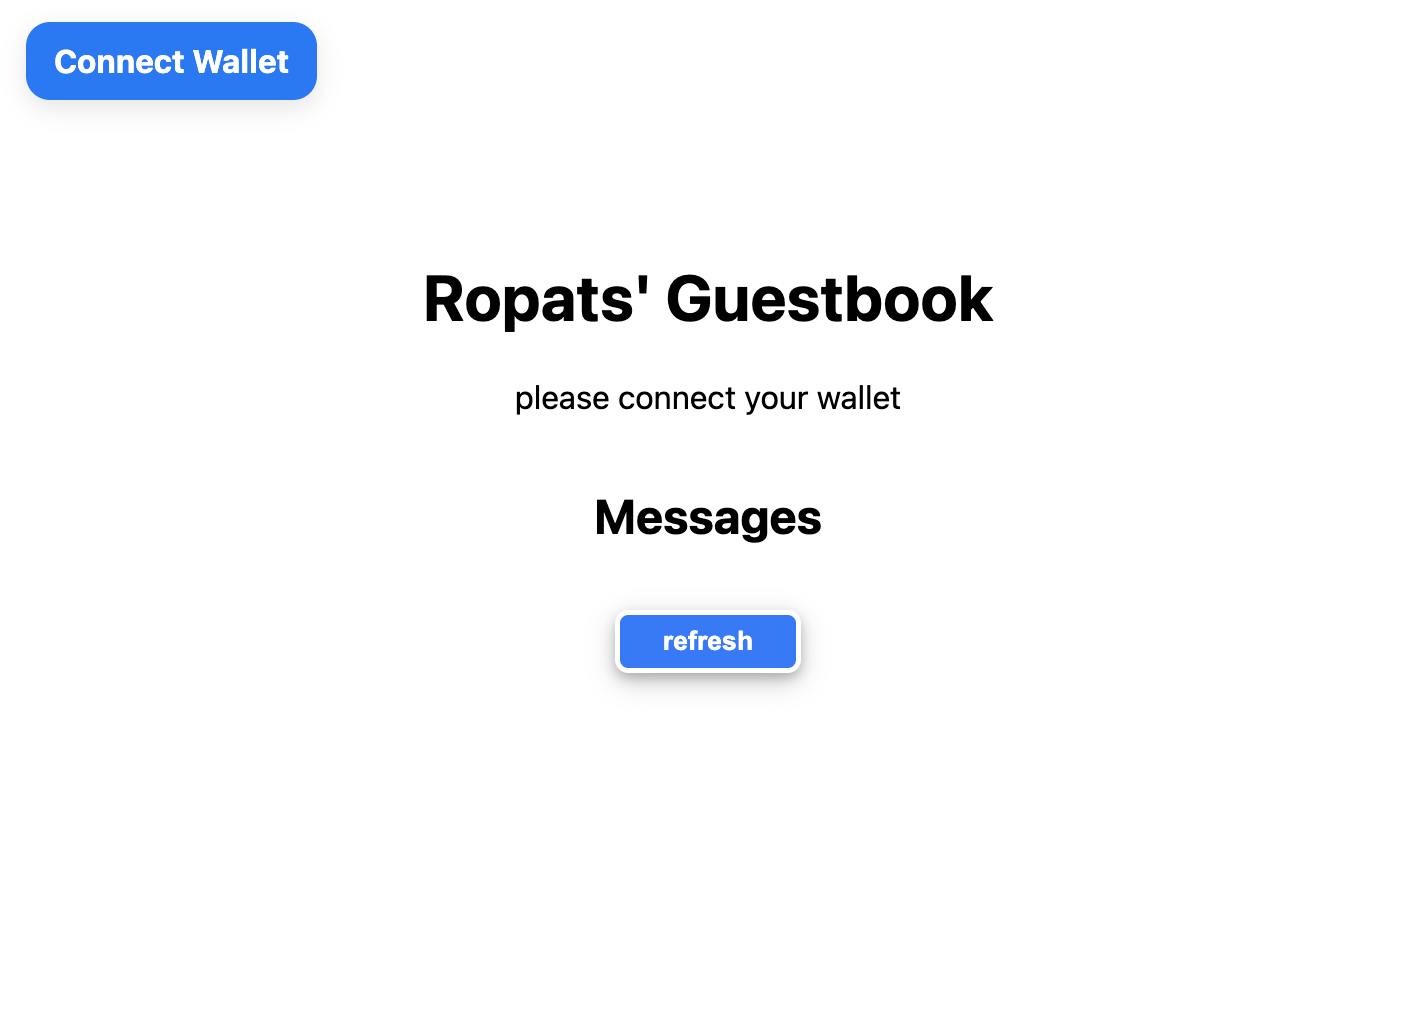
Try connecting your wallet and interacting with the two buttons to see if they work as expected.
Once we enter and submit a message, the app will prompt us to sign the transaction, and after a few months, the input box will reappear. This means our transaction has gone through.
Then, we can hit the refresh button and see if the message renders.
We've just accomplished some great stuff! Woohoo! Pat yourself on the back, and maybe take a breather. After this, we're going to cover the final stretch!
Uploading to Arweave using Bundlr CLI
Exporting the Application
When uploading an application to Arweave, it must be in static HTML format, i.e., it can run on its own without needing a Node.js server. While exporting our files, the code in the next.config.js file must look like the one below so that all the exported content has paths relative to the index file and all our components and dependencies can work as expected. Thanks to our starter repo, this is already set up.
/** @type {import('next').NextConfig} */
const nextConfig = {
  reactStrictMode: true,
  trailingSlash: true,
  exportPathMap: function() {
    return {
      "/": { page: "/" }
    };
  },
  assetPrefix: './',
}

module.exports = nextConfig
Now we can simply export our application by running the following in the command line:
Remember to terminate your dev environment (localhost node) before exporting.
npm run build

#or

yarn build
After running this command, many files and folders will appear in the root directory (main folder). We're particularly interested in the out directory. This is the one we will upload to Arweave.
Note: You need the
outdirectory for NextJS applications.
Understanding Bundlr CLI Commands and Options
Okay, so we're almost ready to upload our application. But when uploading, there are specific terms that we will need to use to tell Bundlr CLI what it must do. Let's understand these terms that we're going to need.
Commands
Bundlr lets us use commands from its client package directly without the need for a global installation. We can do this simply by beginning any command with npx @bundlr-network/client.
The commands we will be using for uploading are:
balance <wallet address>checks the balance we have provided to a Bundlr node to use for uploading our data.fund <amount>funds a Bundlr node with the specified amount and associates this balance with our wallet address (account).upload-dir <folder>uploads a folder.
Options
Options are flags followed by a value that sets conditions for the commands.
-h or --host <string>: The Bundlr node we want to use to deploy (eg http://node2.bundlr.network).-w or --wallet <string>: The path to a wallet key file (for arweave) or the actual private key of the wallet (for other tokens like MATIC).-c or --currency <string>: The currency we want to use for uploading data (e.g., MATIC).--index-file <string>: The file's name to use as an index when uploading a directory.
Read more about Bundlr CLI here.
Funding a Bundlr Node
Now that we understand what commands and options we need, we're going to fund a node so that we can upload our application. We will use $MATIC here but feel free to try out other currencies from the list here.
The command for funding should look like this:
npx @bundlr-network/client fund 18000000000000000 -w <private key> -c matic -h https://node2.bundlr.network
Remember to paste your private key or path to the key file (for Arweave). Learn how to get your private key here.
The command above says that we want to fund 0.018 $MATIC to the specified bundlr node using the specified wallet.
Select yes to move forth if prompted to install the package.
For $MATIC, Bundlr takes the amount to be funded in Wei. The Bundlr CLI gives us another prompt when running this command so that we can confirm the amount we want to fund. Our application should take about 16500000000000000 Wei or 0.0165 MATIC, but we'll fund a slightly higher amount just in case.
After running the fund command, it takes some time for the transaction to be approved and the balance to be reflected. We can check our transaction details on the Arweave Block Explorer. The wait time can go up to ~35-40 mins, but we're working with some revolutionary stuff here. Let's show some love and patience so the Bundlr team can continue to build and scale their solutions and give us shorter wait times in the future!
The command for checking our node balance is:
npx @bundlr-network/client balance <wallet address> -c matic -h https://node2.bundlr.network
Uploading the Application
We're finally there! If the Bundlr balance has been updated, we can upload our application. All it needs is the following command:
npx @bundlr-network/client upload-dir out/ --index-file index.html -w <wallet address> -c matic -h https://node2.bundlr.network
Note: The index file path is relative to your upload directory. The exported directory has a static HTML index file that we're pointing to.
- The Bundlr CLI once again gives us a prompt seeking our confirmation. It also shows the number of funds we need to upload our application.
Once our application upload is finished, the CLI will give us a link pointing to our application.
The final repo has some configurations necessary for deploying to Polygon in case y'all want to do the same but always use test networks first. Also remember to update the RPC Provider API key when using a different network.
Wooohoooo! 🎉
We just built and uploaded a fully decentralized application. Show it off to your friends!
Thanks for joining me on this journey to create a fully decentralized DApp.
Here's my final Guestbook deployed on Polygon so that I can have my friends messages on the main net. Show some love by leaving a message on my application if you liked this article! ❤
Feel free to share your learnings and tag me or reach out for doubts on Twitter (ropats16).